TFT Screen with Arduino

hello guys thank you for returning back again and i hope you enjoy today's article
today we will connect a TFT Screen with Arduino and undrestand how we can write a message or changing the background color .
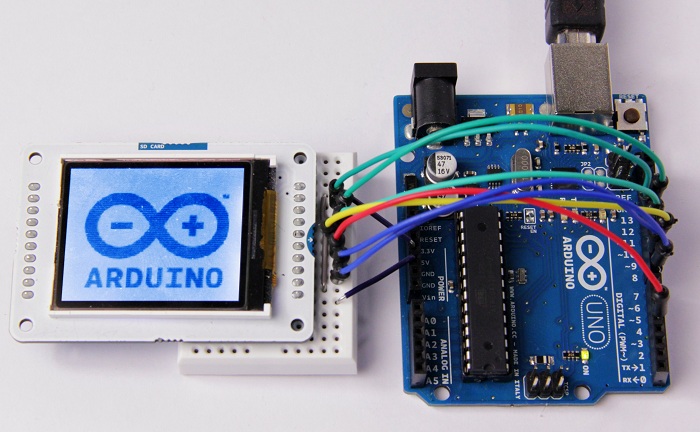
for that we need to know some basics as the TFT pins and how we can connect it to arduino . Also we will use the TFT library wich give us a specific wiring which it depends on the type of our board .
TFT
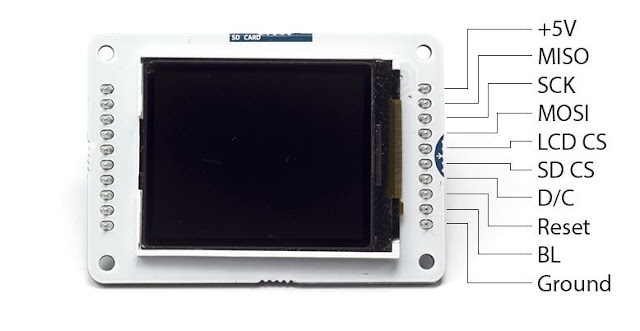
this figure show us the different function of each pin of our TFT screen
Connecting TFT Screen
the TFT library has a specific pins to connect with our screen. we ll take the arduino UNO and MEGA for example.
with Arduino UNO
| +5V: | +5V |
| MISO: | pin 12 |
| SCK: | pin 13 |
| MOSI: | pin 11 |
| LCD CS: | pin 10 |
| SD CS: | pin 4 |
| D/C: | pin 9 |
| RESET: | pin 8 |
| BL: | +5V |
| GND: | GND |
with Arduino MEGA
| +5V: | +5V |
| MISO: | 50 on Mega 2560 (Miso on ADK) |
| SCK: | 52 on Mega 2560 (Sck on ADK) |
| MOSI: | 51 on Mega 2560 (Mosi on ADK) |
| LCD CS: | pin 10 |
| SD CS: | pin 4 |
| D/C: | pin 9 |
| RESET: | pin 8 |
| BL: | +5V |
| GND: | GND |
we ll today use the TFT to test if a device is detected or not.
Code
#include <TFT.h> // Arduino LCD library
#include <SPI.h>
#define cs 10
#define dc 9
#define rst 8
int dev=2;
int Read;
String str1 = "detected";
String str2 = "not detected";
TFT TFTscreen = TFT(cs, dc, rst);
char strc1[13];
void setup() {
pinMode(dev,INPUT);
TFTscreen.begin();
TFTscreen.background(255, 0, 0);
TFTscreen.stroke(0, 0, 0);
TFTscreen.setTextSize(2);
TFTscreen.text("Device \n ", 0, 0);
TFTscreen.setTextSize(2);
}
void loop() {
Read=digitalRead(dev);
if (Read==HIGH) {
str1.toCharArray(strc1, 13);
TFTscreen.stroke(0, 0, 0);
TFTscreen.text(strc1, 0, 20);
}
else {
str2.toCharArray(strc1, 13);
TFTscreen.stroke(0, 0, 0);
TFTscreen.text(strc1, 0, 20);
}
delay(1000);
TFTscreen.stroke(255,0,0);
TFTscreen.text(strc1, 0, 20);
}


Aucun commentaire:
Enregistrer un commentaire